Xming with Raspberry Pi
Crustless Pi
This is detailed recipe (with bad puns!) for getting a Raspberry Pi displaying, out-of-the-box, via PuTTY and Xming on Windows. The method described is headless (AKA crustless: the Pi needs no keyboard, mouse or TV/monitor connected to perform it) but it's not compulsory to be so :). This is just a convenient method to make some simple file changes (that I use) with only a network cable and micro USB power connected to the Pi.
The method uses a Linux computer for setting the Raspbian image on the SD card (Raspbian changes shown here could just be deferred on a headed Pi). You need the Pi, not yet powered-up, connected to your network plus an SD card + USB adaptor; the latter just for interfacing the SD card to the Linux computer if it has no SD card slot.
Note: for this method the network (192.168.0.0) has connected: a Windows computer, raspberrypi (will be set to 192.168.0.6) and an internet gateway machine/firewall/router (192.168.0.5). A Linux computer is also needed, but it does not have to be on the 192.168.0.0 network.
Some of the window captures below may not exactly match what you now see with the latest Raspbian «wheezy» image.
Pi & bash
Download, copy to SD memory and customise the Raspbian «wheezy» image.
Note: commands shown ($ command) in this section are for the Linux computer.
-
Download Raspbian «wheezy» 2013-09-25-wheezy-raspbian.zip to, for example, a Linux computer directory /scratch (the zip is 577 MB download and the extracted image, for the SD card, is 2.75 GB).
$ cd /scratch
$ sha1sum 2013-09-25-wheezy-raspbian.zip
99e6b5e6b8cfbf66e34437a74022fcf9744ccb1d  2013-09-25-wheezy-raspbian.zip
$ unzip 2013-09-25-wheezy-raspbian.zip
Archive:  2013-09-25-wheezy-raspbian.zip
  inflating: 2013-09-25-wheezy-raspbian.img
-
Plug your SD/adaptor into the Linux computer (best to reformat the SD card first). Find the device that is your SD card
$ fdisk -l
...
   Device Boot      Start         End      Blocks   Id  System
/dev/sdc1            8192     7744511     3868160    b  W95 FAT32
shows a
/dev/sdc1partition, for me, and a 4GB SD card (but check really carefully you get the right device + the SD card is about to be imaged and all its original contents lost!)$ umount /dev/sdc1 umount: /dev/sdc1: not mounted
just in case it is mounted and copy the image to the SD card (takes a while)
$ dd bs=4M if=2013-09-25-wheezy-raspbian.img of=/dev/sdc
706+1 records in
706+1 records out
2962227200 bytes (3.0 GB) copied, 601.61 s, 4.9 MB/s
Note: use of device:
/dev/sdc, not the first partition on the device:/dev/sdc1.$ sync
to flush system buffers before removing the SD/adaptor.
You can see the Raspbian partitions on the SD card
$ parted -l
...
Model: SanDisk SDDR-113 (scsi)
Disk /dev/sdc: 3965MB
Sector size (logical/physical): 512B/512B
Partition Table: msdos

Number  Start   End     Size    Type     File system  Flags
 1      4194kB  62.9MB  58.7MB  primary  fat16        lba
 2      62.9MB  2962MB  2899MB  primary  ext4
Note: you now have two partitions, the first
/bootand the second/, for the Raspbian file system.-
Unplug the SD/adaptor and plug it back in again. The new partition will not mount if you don't do this.
-
Mount partition
/dev/sdc2and go to the location of the first, of three, files to be changed$ mkdir /media/external if the directory /media/external does not exist $ mount -t ext4 /dev/sdc2 /media/external $ cd /media/external/etc/network
I'm going to set the interface on the Pi to be static address: 192.168.0.6, and the internet gateway: 192.168.0.5. First edit file
interfaces(file changes are show in unified format:diff -u)$ diff -u save_interfaces interfaces --- save_interfaces 2012-12-15 17:59:24.069999998 +0000 +++ interfaces 2012-12-17 14:52:30.831407245 +0000 @@ -1,7 +1,10 @@ auto lo iface lo inet loopback -iface eth0 inet dhcp +iface eth0 inet static +address 192.168.0.6 +netmask 255.255.255.0 +gateway 192.168.0.5 allow-hotplug wlan0 iface wlan0 inet manual
Add at least one nameserver to file
/media/external/etc/resolv.conf(my gateway is also a DNS server). You can just add your ISP's DNS servers.Change directory (i.e. up to
/media/external/etc) and edit fileresolv.conf$ cd .. $ diff -u save_resolv.conf resolv.conf --- save_resolv.conf 2012-12-15 17:40:46.659995278 +0000 +++ resolv.conf 2012-12-17 14:54:03.913156182 +0000 @@ -1 +1 @@ -nameserver 8.8.8.8 +nameserver 192.168.0.5
Correct the host address in file
hostsdiff -u save_hosts hosts --- save_hosts 2013-02-09 01:24:59.380002225 +0000 +++ hosts 2013-02-12 22:38:28.731821935 +0000 @@ -5,4 +5,4 @@ ff02::1 ip6-allnodes ff02::2 ip6-allrouters -127.0.1.1 raspberrypi +192.168.0.6 raspberrypi
-
Enable the ssh server (it's disabled by default). Still from directory
/media/external/etc$ for files in `find . -type l -name \*ssh`; do ls $files; done ./rc3.d/K01ssh ./rc5.d/K01ssh ./rc4.d/K01ssh ./rc2.d/K01ssh
these symbolic links need to be changed. Use this as a script file
#!/bin/sh
rm ./rc3.d/K01ssh
rm ./rc5.d/K01ssh
rm ./rc4.d/K01ssh
rm ./rc2.d/K01ssh
ln -s ../init.d/ssh ./rc3.d/S02ssh
ln -s ../init.d/ssh ./rc5.d/S02ssh
ln -s ../init.d/ssh ./rc4.d/S02ssh
ln -s ../init.d/ssh ./rc2.d/S02ssh
Get out of the mounted partition and dismount it
$ cd
$ umount /media/external
You are finished on the Linux computer. Remove the SD/adaptor.
Eureka
Transfer the SD card to the Pi and power it up. It should boot and be able to respond to ping and service SSH requests.
$ ping 192.168.0.6
Ping should respond on the Pi itself and elsewhere on the network (and where named to: raspberrypi).
Raspberry blown?
If you have a problem, or get one later, you can move the SD card back to the Linux computer, mount partition 2 again and examine the logs in directory /media/external/var/log
I clean SD cards with the official SD Association formatter, before reusing them, as it removes any partitions automatically.
Pi SSH
Use PuTTY to login to the Pi remotely via SSH, configure and update the Raspbian OS, and prepare for use with XDMCP and X-Forwarding.
Note: commands shown ($ command) in this section are for your Pi via PuTTY on Windows.
-
Run
PuTTY.exeon your Windows computer.Enter the address of raspberrypi (192.168.0.6 in this case), set the remote character set to UTF-8 and click «Open».
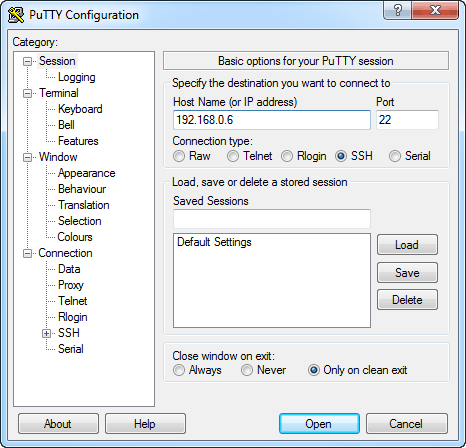
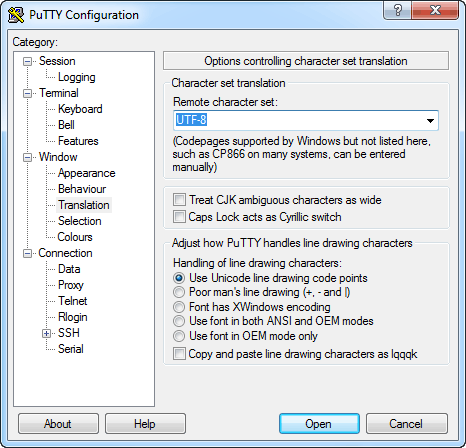
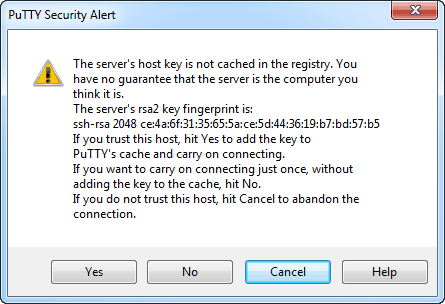
Click «Yes» to the PuTTY Security Alert...we do trust this host!
-
At the PuTTY terminal prompt respond
pitologin as:andraspberrytopi@192.168.0.6's password:You should now have a command line terminal for
pi@raspberrypi:~Enter:
sudo raspi-config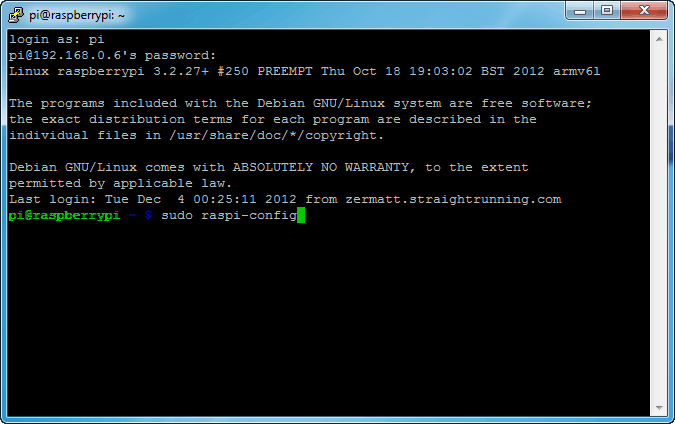
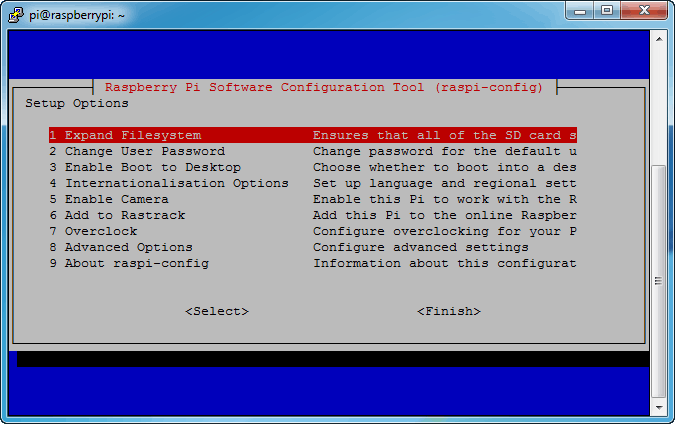
You need to «Expand Filesystem» (if your SD card is bigger than 4GB), set «Console Text console, requiring login (default)» for «Enable Boot to Desktop/Scratch», check/set «Internationalisation Options» and «Select» «Advanced Options/Update». Note: that your ssh server should be left enabled, and the default locale is for the UK. Re-run
raspi-configagain anytime you want to change these options. -
You should be on the internet (via your gateway) so do a full upgrade
$ sudo apt-get update
$ sudo apt-get upgrade
Go make coffee...upgrade may take some time!
You don't want all that login spam again and a reboot is now needed
$ touch .hushlogin
$ sudo shutdown -r now
Your PuTTY terminal will disconnect, so close it, wait a while and reconnect with PuTTY when the Pi has booted (use ping to check it's up).
-
Log back in to the PuTTY terminal for user
pi.Give
roota password and remember it (optional...it's your Pi...you can rebuild the image yourself if you destroy it...plus you don't want to keep typing sudo to do useful work!)$ sudo passwd root
But I suggest you add (or enable) some aliases in
~/.bashrcfor both userpiandrootto protect yourself a little.--- save_.bashrc 2012-10-28 22:09:34.740000001 +0000 +++ .bashrc 2012-11-25 07:56:57.832897001 +0000 @@ -86,6 +86,10 @@ #alias la='ls -A' #alias l='ls -CF' +alias rm='rm -i' +alias cp='cp -i' +alias mv='mv -i' + # Alias definitions. # You may want to put all your additions into a separate file like # ~/.bash_aliases, instead of adding them here directly.
Note:
roothas slightly different contents, in.bashrc, to that above. -
Become super user
root$ su -
login and install package xdm
$ apt-get install xdm
this runs
dpkg-reconfigure xdm
as part of the install and displays
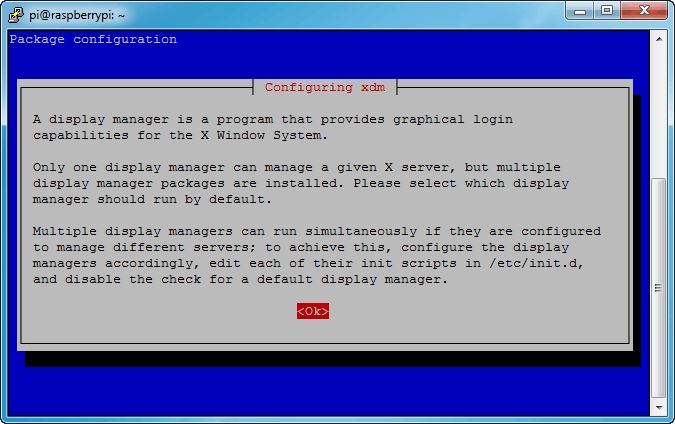
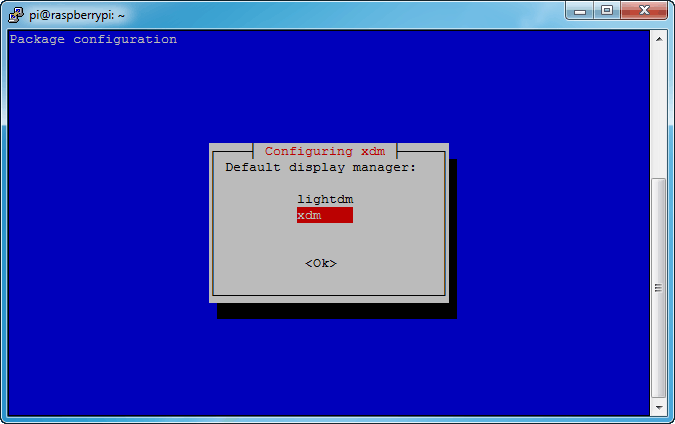
choose
xdmas the default display manager. -
In
/etc/X11/xdmchange two files to allow remote access (so please be careful who can «sniff» traffic on your network)--- save_xdm-config 2012-04-29 22:19:04.000000000 +0100 +++ xdm-config 2012-12-02 19:04:16.545476001 +0000 @@ -33,4 +33,4 @@ ! SECURITY: do not listen for XDMCP or Chooser requests ! Comment out this line if you want to manage X terminals with xdm -DisplayManager.requestPort: 0 +! DisplayManager.requestPort: 0
and
--- save_Xaccess        2012-04-29 22:19:04.000000000 +0100
+++ Xaccess     2012-12-02 18:49:23.839205000 +0000
@@ -43,7 +43,7 @@
 # right hand sides can match.
 #

-#*                                     #any host can get a login window
+*                                      #any host can get a login window

 #
 # To hardwire a specific terminal to a specific host, you can
-
Start
xdmand install packagex11-apps:$ service xdm start $ apt-get install x11-apps
Create a
~/.Xdefaultsfile for userspiandroot, containing one line (to displayx11-appsin colour)*customization:-color
Make sure XDMCP is listening on port 177/udp
$ netstat -ulnp | grep 177
udp        0      0 0.0.0.0:177             0.0.0.0:*                           2864/xdm
XDMCP mode and X-Forwarding are now available for use.
Pi Xming
Xming in now able to interact with the Pi in a number of ways.
-
XDMCP mode
On your Windows computer run
Xming :1 -query 192.168.0.6
or why not try out some of Xming's options?
Xming :1 -query raspberrypi -clipboard -wgl -once -resize -screen 0 1280x720+100+100@1
Logging in via Debian wheezy's xdm greater
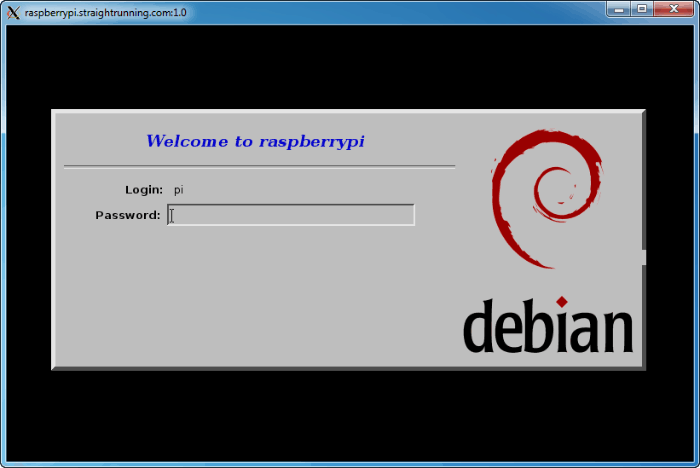
this «Welcome to raspberrypi» login also appears when headed
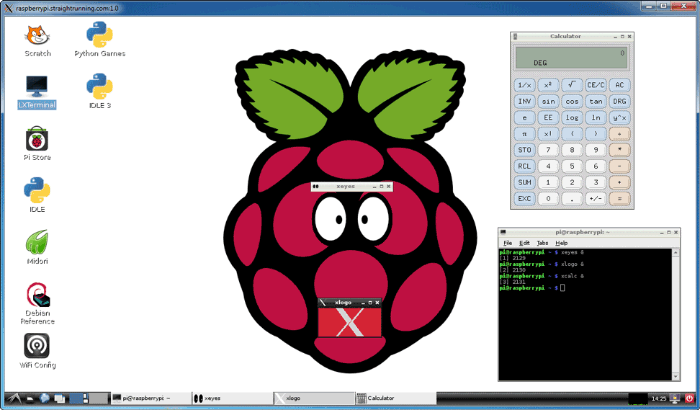
The desktop displaying some of the X11-apps you installed earlier. Have fun :).
Logout the LXDE (Lightweight X11 Desktop Environment) session properly from the Task Bar (LXPanel) when finished.
-
X-Forwarding
Start an Xming multiwindow mode server
Xming -multiwindow -clipboard
You have used PuTTY above: time to add settings for SSH X11 forwarding
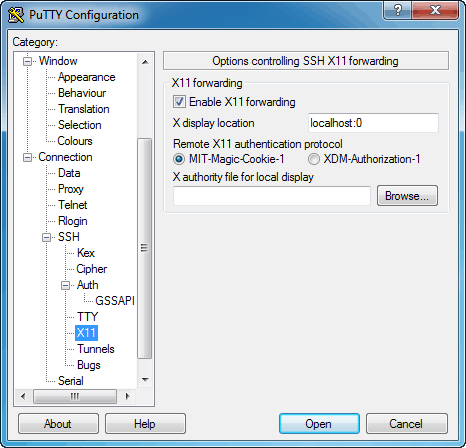
Now click «Open» and login as
pi/raspberryas before. At the PuTTY terminal type$ midori
the Midori browser (or most other applications) will display, and interact with the user, on the Windows desktop

-
Finally: I recommend you don't use startlxde or lxsession via PuTTY as you can't Logout cleanly and the Pi's resources may be left in unknown states (e.g. processes and files not gracefully flushed, stopped or closed).